Security Updates(apt-get updates) or Turnkey(install-security-updates)

run: apt-get updates

returns something like: There is no public key available for the following key IDs: 3B4FE6ACC0B21F32

Fix: sudo apt-key adv --recv-keys --keyserver keyserver.ubuntu.com 3B4FE6ACC0B21F32

Then: apt-get updates

Fixed!(hopefully)

OS: Linux(Debian) User: root

note, remove nzb user and replicate process for ntfs share for sabnzbd user

Useful links: https://gist.github.com/joshenders/4181257 http://www.nasdestruction.com/tutorial-installing-debian-squeeze-sabnzbd-sickbeard-couchpotato-headphones-d-link-dns-320-dns-325/

Install Git:

apt-get install git-core

Create user for Sab and make symbolic link from source to sabnzbd home:

useradd --system --shell /bin/false --no-create-home --home /home/sabnzbd sabnzbd
ln --symbolic /usr/src/sabnzbd /home/sabnzbd

Download Sabnzbd Source:

cd /usr/src/
git clone git://github.com/sabnzbd/sabnzbd.git
chown --recursive sabnzbd:sabnzbd sabnzbd

Install Dependencies:

apt-get install python python-cheetah python-configobj python-feedparser python-dbus python-openssl python-support python-yenc par2 zip unzip

Install Special version of Unrar(non-free):

pico /etc/apt/sources.list

Add to top: "http://http.us.debian.org/debian wheezy main contrib non-free" then:

apt-get update
apt-cache search unrar
Note: unrar - Unarchiver for .rar files (non-free version)
apt-get install unrar

Download Config files for initializing Sabnzbd(sabnzbdplus.default and sabnzbdplus.ini) - Note: designed for "sabnzbd" user:

cd /usr/src
git clone git://gist/github.com/4181257.git

Install init scripts(just downloaded):

cd /usr/src
cp sabnzbdplus.init /etc/init.d/sabnzbdplus
cp sabnzbdplus.default /etc/default/sabnzbdplus
chmod +x /etc/init.d/sabnzbdplus

Take Ownership of sabnzbd directory(as sabnzbd user):

cd /usr/src
chown -R sabnzbd:sabnzbd sabnzbd/

Edit Hostname and port for SABNZBD at startup:

pico /etc/default/sabnzbdplus

Change: Hostname:0.0.0.0 Port:8080

Start Sabnzbd:

/etc/init.d/sabnzbdplus start

Navigate to: ipaddress-running-sab:8080

Add Sab to default runlevel:

update-rc.d sabnzbdplus defaults

Normal Response - update-rc.d: using dependency based boot sequencing

Install Sickbeard, Couchpotato, Headphones, and Transmission

git clone git://github.com/midgetspy/Sick-Beard.git

To install CouchPotato run the following command:

git clone https://github.com/RuudBurger/CouchPotatoServer.git

To install Headphones run the following command:

git clone git://github.com/rembo10/headphones.git

Allow each of these applications to right to their own directory as sabnzbd user:

chown --recursive sabnzbd:sabnzbd CouchPotatoServer
chown --recursive sabnzbd:sabnzbd headphones
chown --recursive sabnzbd:sabnzbd Sick-Beard

Create symbolic links to home directory:

ln --symbolic /usr/src/CouchPotatoServer /home/CouchPotatoServer
ln --symbolic /usr/src/headphones /home/headphones
ln --symbolic /usr/src/Sick-Beard /home/Sick-Beard

Once those are installed you can start each service by running the following commands :

python Sick-Beard/SickBeard.py -d
python CouchPotatoServer/CouchPotato.py --daemon
python headphones/Headphones.py -d

You can access each service once started by typing the IP address of your NAS into your web browser and using the following ports for each service:

SickBeard on port 8081 ( yourNASIPHere:8081 ) CouchPotato on port 5050( yourNASIPHere:5050 ) Headphones on port 8181 ( yourNASIPHere:8181 )

Re-Own after first run as as it was originally run as root and created additional files:

chown --recursive sabnzbd:sabnzbd CouchPotato
chown --recursive sabnzbd:sabnzbd headphones
chown --recursive sabnzbd:sabnzbd Sick-Beard

Config Sickbeard to start on Startup:

cd /usr/src/Sick-Beard
cp init.ubuntu /etc/init.d/sickbeard
chmod +x /etc/init.d/sickbeard

Configure Defaults file all for Sickbeard

nano /etc/default/sickbeard
SB_USER=sabnzbd
SB_HOME=/usr/src/Sick-Beard
SB_DATA=/usr/src/Sick-Beard
SB_OPTS="--config=/usr/src/Sick-Beard/config.ini"
update-rc.d sickbeard defaults

Configure Defaults file all for CouchPotato:

cd /usr/src/CouchPotatoServer
cp ubuntu /etc/init.d/couchpotato
cp ubuntu.default /etc/default/couchpotato
chmod +x /etc/init.d/couchpotato

nano /etc/default/couchpotato

# COPY THIS FILE TO /etc/default/couchpotato
# OPTIONS: CP_HOME, CP_USER, CP_DATA, CP_PIDFILE, PYTHON_BIN, CP_OPTS, SSD_OPTS

CP_HOME=/usr/src/CouchPotatoServer
CP_USER=sabnzbd
CP_DATA=/usr/src/CouchPotatoServer
SB_OPTS="--config=/usr/src/Sick-Beard/config.ini"
SB_PID=/var/run/potato/couchpotato.pid
update-rc.d couchpotato defaults

Configure Startup settings for headphones:

cd /usr/src/headphones/init-scripts
cp init.ubuntu /etc/init.d/headphones
chmod +x /etc/init.d/headphones
nano /etc/default/headphones
HP_USER=sabnzbd
HP_HOME=/usr/src/headphones
HP_DATA=/usr/src/headphones
update-rc.d headphones defaults

Configure URL Bases for Proxy(apps must be shut off when editing config files): At the top of /etc/apache2/sites-enabled/"mainsite" make sure to add ProxyPreserverHost On Sickbeard - in config - /sickbeard CouchPotato - in web - /potato Headphones - in config must be off - /headphones Sabnzbd - auto

Configure Auto-Mount in Virtualbox for sabnzbd user:

adduser sabnzbd vboxsf

Updating Sabnzbd:

cd /usr/src/sabnzbd
sudo -u sabnzbd git pull

Installing Sonarr:

apt-key adv --keyserver keyserver.ubuntu.com --recv-keys FDA5DFFC

echo "deb http://apt.sonarr.tv/ master main" | sudo tee /etc/apt/sources.list.d/sonarr.list

apt-get update

apt-get install nzbdrone

To Start: mono /opt/NzbDrone/NzbDrone.exe

Default Port/Site: http://localhost:8989
OS: Linux(Debian) User: root

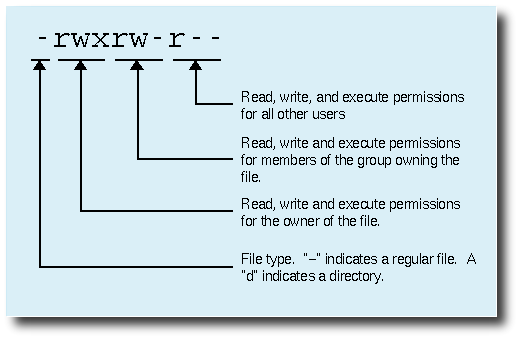
UNIX/Linux has no per-user permissions/rights/policies. Everything is done on files, making sure who can read/write/exectute the right files. To check the current permissions of files, run "ls -l". If you run "ls -l /", to list all files in the root directory, you will get output that looks something like this:

drwxr-xr-x    2 root     root         4096 2003-07-15 22:41 bin
drwxr-xr-x    4 root     root         1024 2003-07-16 03:26 boot
drwxr-xr-x   20 root     root       118784 2003-07-16 03:32 dev

The first column (that looks like drwxr-xr-x) is the mode of the file. The first character indicates what kind of file it is. d, as in this case, means directory. - means regular file, and then there are some other file types of which you need not know more now, like named FIFOs, sockets, devices, etc. The rwxr-xr-x is the permissions of file. The first rwx means that the owner of the file can read, write and execute the file. For directories, the right to execute it means the right to use it. Just being able to read a directory means that you can read what files are in the directory, but you won't be able to use them without the execute permission on the directory. The first r-x means that those that are in the same group as the file have read and execute permissions to the file.

The second r-x means that all those that are neither the owner of the file nor are in the same group as the file have read and execute permissions on it. So r=read, w=write and x=execute, and the first group of three applies to the owner of the file, the second group applies to those in the same group of the file, and the third group applies to all other users. The second column (2, 4 and 20 in this case) is the number of links that the file has. Don't care about that for now. The third column is the owner of the file, in this case root. The fourth column is the group of the file, in this case the root group.

The fifth column is the size of the file. The sixth is the time the file was last modified The seventh is naturally the name of the file.

Picture Summary:

linuxfilepermissions

chmod /change the permissions of a file/

chown /change the owner of the file/

chgrp /change the group that the file belongs to/

example: chmod 777 somefile.file /*

This gives exe write and read to all */ not recommended for any file.

for chmod here is a list of the numbers and what they meen

the 100's are for the owner of the file 400 read 200 write 100 execute

10's are for the group of the file 40 read 20 write 10 execute

1's are for everyone else 4 read 2 write 1 execute

you add the number together to get different permmisions

Example: How to change owner and owner group of a file

chown -R sabnzbd:sabnzbd sabnzbd/
  • -R: Recursive, own directory and all contents

How to add a user to a group:

usermod -a -G <groupname> username

Change user's primary group:

usermod -g <groupname> username

What group user is assigned to:

id <username>

View all groups:

groups or users

Add new user and assign group:

useradd -g <groupname> username

Add single user to multiple groups:

usermod -a -G ftp,admins,othergroup <username>

Assign user a password:

passwd jsmith

Add a group:

groupadd <groupname>

Limiters in PFSENSE

The limiter feature allows you to setup Dummynet pipes. Dummynet was designed to be able to simulate any kind of network connection. You can simulate a dialup connection, a T1, a T1 run through a microwave oven, or a satellite connection to the Moon. A side effect of being able to simulate any type of network connection is that you can use them to limit the amount of bandwidth a host or group of hosts have access to. Both the packet shaper and limiters can be used at the same time so you can shape your traffic as a whole, and also limit certain traffic to a certain amount of bandwidth. There are 2 basic steps to setting up a limiter to control bandwidth. Setup the limiters you will be using. Assign traffic to those limiters.

Setup Limiters

Limiters are setup by creating them under Firewall > Traffic Shaper, on the Limiters tab. You can use just one pipe for both inbound and outbound traffic, but that would mean you are simulating a half-duplex connection. The recommended method is to create 2 pipes, one for inbound traffic and one for outbound traffic. The direction is from the perspective of the interface. If using limiters on LAN, the inbound queue is your upload and the outbound queue is your download. You should name the pipes so that you will easily remember which one is which, such as InLimitLan and OutLimitLan.

Dynamic queue creation

Dummynet pipes have a feature called dynamic queue creation which allows you to have a unique queue based on the uniqueness of a connections source protocol, ip, source port, destination ip or destination port. They can also be used in combination. pfSense currently only allows setting the source address or the destination address as the mask, meaning that you can give each host behind your firewall its own set of pipes so that each node is restricted to using a certain amount of bandwidth. To do this you would give your In pipe a Source Address mask, so that each host sending packets gets it's own dynamic pipe for uploading. You would give your Out pipe a destination address mask, so that each host receiving packets gets it's own dynamic pipe for downloading.

Assign Traffic

Once you setup a limiter pipe, the next step is to assign traffic to it by setting the "in/out" option in a firewall rule. Remember that in and out are from the perspective of that interface on the firewall. If you're choosing limiters on the LAN interface, "out" is download speed (traffic from the LAN NIC into the LAN) and "in" is upload speed (traffic from the LAN into the LAN NIC). Simply creating the limiters does not do anything, you must assign them on a firewall rule for them to be used.

Limiter status

The bandwidth usage and other limiter information is available under Diagnostics>Limiter Info.

Captive Portal Notes

Captive portal can automatically setup its own pipes for each logged in user, no need to set this up manually. Take a look at the captive portal setup page to set this up.

Using Limiters for Bandwidth Guarantees

If you want to use limiters to guarantee a certain amount of bandwidth instead of limit, you can do so by making four limiters:

  1. Bandwidth to guarantee upload
  2. Bandwidth to guarantee download
  3. Total bandwidth upload (less guaranteed above)
  4. Total bandwidth download (less guaranteed above)

Ensure that you do not set the Mask to anything other than "none". It must be "none" for these to work properly. So if you have 8Mb down and 2Mb up, and you want to guarantee 512Kb/s for service X, you'd have queues sized like so:

  • 512 Kb/s
  • 512 Kb/s
  • 1536 Kb/s
  • 7680 Kb/s

Then direct the guaranteed service traffic into the first two limiters, and everything else into the "total" limiters.

UnOfficial Directions:

Go to the Firewall>>>Traffic Shaper option

Create a new limiter, make sure Enable is checked, name it "500dest", set bandwidth to 500Kbit/s, set mask to destination. Save it.

Create another limiter, make sure Enable is checked, name it "500src", set bandwidth to 500Kbit/s, set mask to source. Save it.

Make sure to apply changes.

Create an alias with all the ip's you want in Firewall>>> Aliases

Name it, save it.

Apply changes.

Go to firewall>>>Rules>>>LAN

Create a new rule. Protocol type ANY, Set the alias(or ipaddress) as the source, scroll down click advanced next to in/out, set the first to 500src, the second to 500dest. Make sure your new rule is higher than any default allow out.

Apply changes and test it out.

Alternatively you could edit the LAN default allow out and add the In/Out option there and it would apply to every host on the LAN individually (each host individually limited to 500Kbps/500Kbps).

Setup information for Linux and Virtual Box:

  • Mounting NTFS Share Command:

    mount.vboxsf -w -o fmode=0777,dmode=0777 folder_name /mnt/path_to_mount_point
    
    • Where fmode and dmode set permissions, folder_name is what you named the folder within the VirtualBox settings and the /mnt/path folder must already exist.
  • Cloning a Virtual Machine via command line:

    C:\Program Files\Oracle\VirtualBox\VBoxManage.exe clonevdi "\path_to_vdi_to_be_cloned" "\path_to_where_cloned_vdi_should_go"
    

woot.